Behind the scenes look at a Secure WebSite
— May 21, 2013In my previous post i introduced secure website and its benefits. In this post we will go behinds the scenes to understand what it takes to make your website secure. I will try to be as generic as possible, however my examples will focus on Apache Traffic Server and NetScaler as load balancer.
Before you can make your website secure ( i.e. enable HTTPS on your website ) you need the following
- Get Web Server Certificate
- Configure SSL Port
Web Server Certificate :
Web server certificates ( also known as SSL certificate) are digital credentials that reside on a server and setup a secure connection between that server and a client or browser.
As described in www.godaddy.com An SSL certificate contains the following information:
- The certificate holder’s name
- The certificate’s serial number and expiration date
- A copy of the certificate holder’s public key
- The digital signature of the certificate-issuing authority
You can buy a SSL certificate from one of the many vendors such as Verisign, Symentec or retailers / web hosting providers such as GoDaddy.com and BlueHost.com. Once you obtain a SSL certificate you need to install it on your web server.
SSL Port :
This is an important step in setting up SSL for your website. The approach you adopt depends on your architecture or web stack. Below are some of the options.
1. Enabling SSL port on your web server ( usually HTTP server)
If you have a simple architecture with a single front-end server (or a cluster of servers) such as Tomcat, IIS or WebSphere you need to enable SSL port on your server. You can refer to the following documents for directions.
2. Enabling SSL port on a Traffic Server
If you are using a traffic server ( like Apache Traffic Server), you need to configure the SSL port of the traffic server and install the SSL certificate.
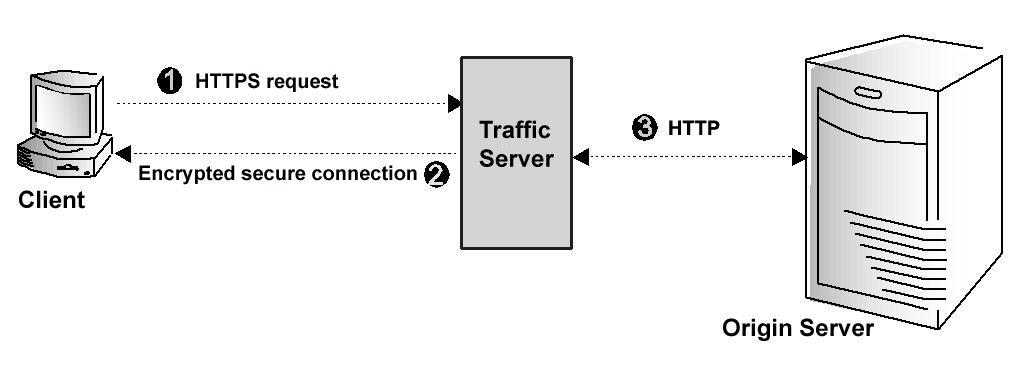
The figure above from www.apache.org illustrates communication between a client and Traffic Server using SSL. Following steps from apache.org describes how SSL works in Apache Traffic Server
Step 1: The client sends an HTTPS request for content. Traffic Server receives the request and performs the SSL ‘handshake’ to authenticate the client (depending on the authentication options configured) and determine the encryption method that will be used. If the client is allowed access, then Traffic Server checks its cache for the requested content.
Step 2: If the request is a cache hit and the content is fresh, then Traffic Server encrypts the content and sends it to the client. The client decrypts the content (using the method determined during the handshake) and displays it.
Step 3: If the request is a cache miss or cached content is stale, then Traffic Server communicates with the origin server via HTTP and obtains a plain text version of the content. Traffic Server saves the plain text version of the content in its cache, encrypts the content, and sends it to the client. The client decrypts and displays the content.
3. Enabling SSL port on Load Balancer
A common practice to increase the scalability of SSL (Secure Sockets Layer) publishing solutions is to use SSL offloading in load balancer, which relieves a web server of the processing burden of encrypting and decrypting traffic. more on configuring SSL on load balancer here.
The figure below from Citrix illustrates the use of load balancers in SSL offloading.

Tagged with:
Tech
About author

Hello I am Hari
I have more than 20 years experience in the information technology (IT) industry. I write about what I’m learning and some of the tips I have picked up along the way.
Leave a reply